The Picket Pin is a pattern from the old west that gets its name from ground squirrels that were nicknamed “picket pins” by cowboys as they resembled the short stakes used to tie off horses. The original fly, developed by Jack Boeme, was tied with tail and body hair from these western ground squirrels. More modern recipes utilize fox squirrel and grey squirrel.
I tied some Picket Pins to try out in the smaller streams in Yellowstone and later realized they were a great pattern for brook trout around home. It’s a wet fly that you can drift or strip just under the surface. You can swing it towards root wads and brushy areas and strip it back just in time to avoid trouble. It often draws a chase from aggressive brookies. It’s white squirrel tail wing provides a good contrast to the body and allows you to focus on the fly and watch for fish. The only trick is to stay calm enough for them to take the fly before you strike.
Hook: 2XL Nymph hook size 10 or 12
Thread: Black
Tail: Fox squirrel tail fibers
Rib: Small copper wire
Body: Peacock herl
Hackle: Brown
Head: More peacock herl
After wrapping the body, add and palmer the hackle back towards the tail and secure by wrapping the wire forward woolly bugger style. A good example of this is covered by Tim Flagler’s tightlinevideo on YouTube
In some of my recent articles I have made reference to taking some fly tying classes at a fly shop in the Twin Cities when I was first getting started. It was at one of those classes that the instructor sparked my interest that has since grown into my love for Yellowstone National Park.On my many trips to Yellowstone I have always based out of Gardiner, Montana. During these trips, I spent a lot of time hanging out at Parks’ Fly Shop, where I first got to know and to fish with Walter Wiese. At that time, Walter was the head guide at Parks’. Walter now operates Yellowstone Country Fly Fishing out of Livingston.From those early trips, it was obvious that I could learn a lot from Walter’s books, website, and also his YouTube fly tying videos.
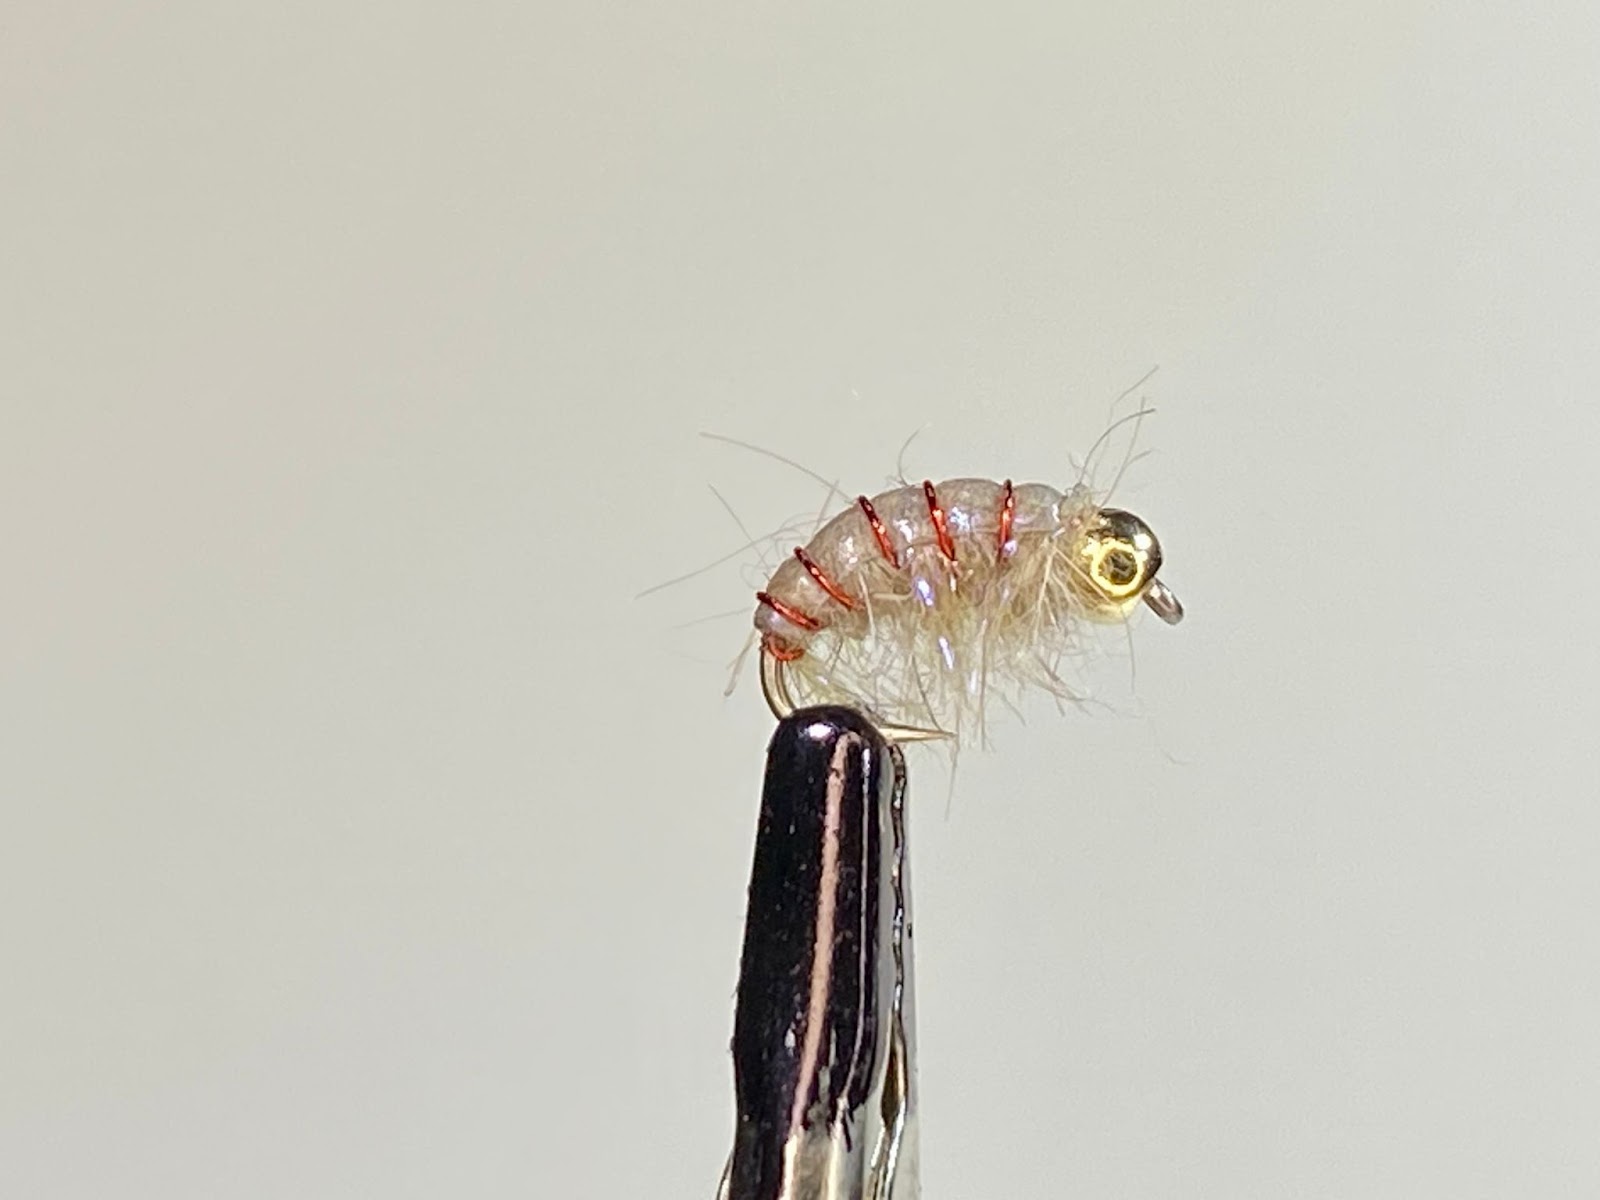
Several years ago, Walter did a video of a nymph he calls the “Gussied Lightning Bug”. For some reason or another, this was a fly that looked to me like it would catch a lot of fish.After watching the video, I headed right to my vise and started to tie up a half dozen or so. The next time I went fishing, I tied one on and guess what? It caught fish, so I headed back to my vise to tie more. That was when I started to make some very minor changes to the fly and actually simplified the tying process. That is how my Gussied-Up Lightning Bug was created. (Have you noticed how creative I am when I name a fly pattern?)This fly is now a mainstay in my fly box. I fish it throughout the season either under an indicator or as a dropper below a hopper. The fly has a very slender profile so it sinks pretty quickly.Until recently I always tied this fly with micro tubing for the rib. I found that the micro tubing was kind of slippery on the tinsel body, so I have now switched up and started to use wire for the ribbing because it makes the fly a little easier to tie. I have also added a silver-bodied variation that has fished well when the water is a little off-color.
You should put some of these flies in your fly box. I think you just might like them as much as I do! As always, please let me know if you have any questions / comments / suggestions.Hook: Size 14 Scud Hook Bead: 2.8 mm Tungsten in Gold Thread: 14/0 Red Tail: Brown Improved Micro Zelon Abdomen: Red Holographic Tinsel size Medium Legs: Red Midge Tinsel Thorax: Super-bright Dubbing in PeacockPaul Johnson Paulwaconia@gmail.com
Hook: Firehole Outdoors #419 16-18 Thread: Magpie Materials Red 72D Shuck: Straight Zelon, Caddis Tan Body: Antron 100% pure, Hare’s ear color Wing: x-Caddis hair
From the Editor: Since it’s Spring here in the Driftless, I felt that it might be a good idea for a bit of education on the life cycle of an important trout food source the Caddisflies: Order Trichoptera.
I contacted my good friend and fly fisher Jonathan Jacobs and asked him if he would consider putting together a brief video-based treatise on Caddisflies. Naturally, Jon, being the good guy that he is, consented. So, we have for your viewing pleasure, two enlightening videos that will give you a pretty nice overview of Caddisflies. You can find them by going to Jon’s YouTube channel at these addresses. https://youtu.be/in3Lm6wSZPY, https://youtu.be/KkRpN8ZVZmA
The first video covers the life cycle of the Caddis and Jon shows us a bunch of patterns that mimic every stage of Caddis development starting with the larvae and progressing to the pupa, and finally the adult. In the second video, Jon ties his version of the x-Caddis, a fly every local angler should carry.
So thank you Jonathan for taking time to do this for us. I’m sure every one viewing will find a few nuggets that will up their catch rate over this coming season.
In my last RipRap article I mentioned taking some fly tying classes at the old Bentley’s Fly Shop. In addition to the Uncased Kinni Caddis, one other fly pattern that was introduced to me was a scud. As my fly tying journey was getting underway, my trout fishing journey was just beginning. In fact, the first trout I ever caught was on an Orange Scud that I tied.
Jumping ahead a couple years, I was lucky enough to be introduced to the Laughing Trout Fly Tying Club. As I settled into a routine of tying with the group on Wednesday evenings, I would hear them mention a fly they called a PPP or sometimes a Potter’s. They would mention the fly, but would never share any details about it. It took a few weeks before any of the members would give me any kind of clue about what this “secret” fly was.
In time, I guess I earned their trust enough to learn that the fly was Potter’s Perfect Pupa. The fly was created by an early member of the group, Dennis Potter. Dennis took a scud-style hook, added a tungsten bead, a length of red wire and black rabbit fur that he tied in with a dubbing loop, and voilà, the Potter’s or PPP was created. The fly took on legendary status on a trip to the Whitewater River by Dennis, Rich Frick and Jim Thomson when it was the only fly that caught fish and that was a group of fishermen that rarely had trouble putting fish in the net.
Some fly-tyers just can’t leave well enough alone (present company included). By the time I joined Laughing Trout, members of the group had put their own spin on the original pattern by changing sizes and dubbing color. One of those variations was a tan Potter’s that was tied with UV Ice Dubbing. I tried tying the fly that way and started catching fish on a regular basis.
When I started to donate fly boxes to Trout Unlimited and other groups, I felt like the fly needed just a little more refinement to look good in a box, so I added a Latex Scud Back. For dubbing I like to mix about half and half tan UV Ice Dubbing and natural rabbit dubbing together in a
coffee grinder (preferably in an appliance dedicated to mixing dubbing so the rabbit fur doesn’t end up in your morning brew).
Hook: Size 12 – 16 Scud Hook
Bead: Gold Tungsten to match hook
Shell: Latex Scud Back
Rib: Red wire, size Brassie
Abdomen: UV Ice Dubbing and Natural Rabbit Fur Dubbing
There are a lot of days on the stream that it seems if you cannot catch a fish on a Potter’s, you might just as well call it a day and go home.
I have been fortunate to, along with two boon companions, spend the second week of July fishing Montana’s Gallatin and Madison Rivers. It was on these trips that I first encountered the nearly mythical Salmon Fly hatch. This event is a spectacle with huge creatures from the Carboniferous Era everywhere along, above, and, most importantly for an angler, on the water.
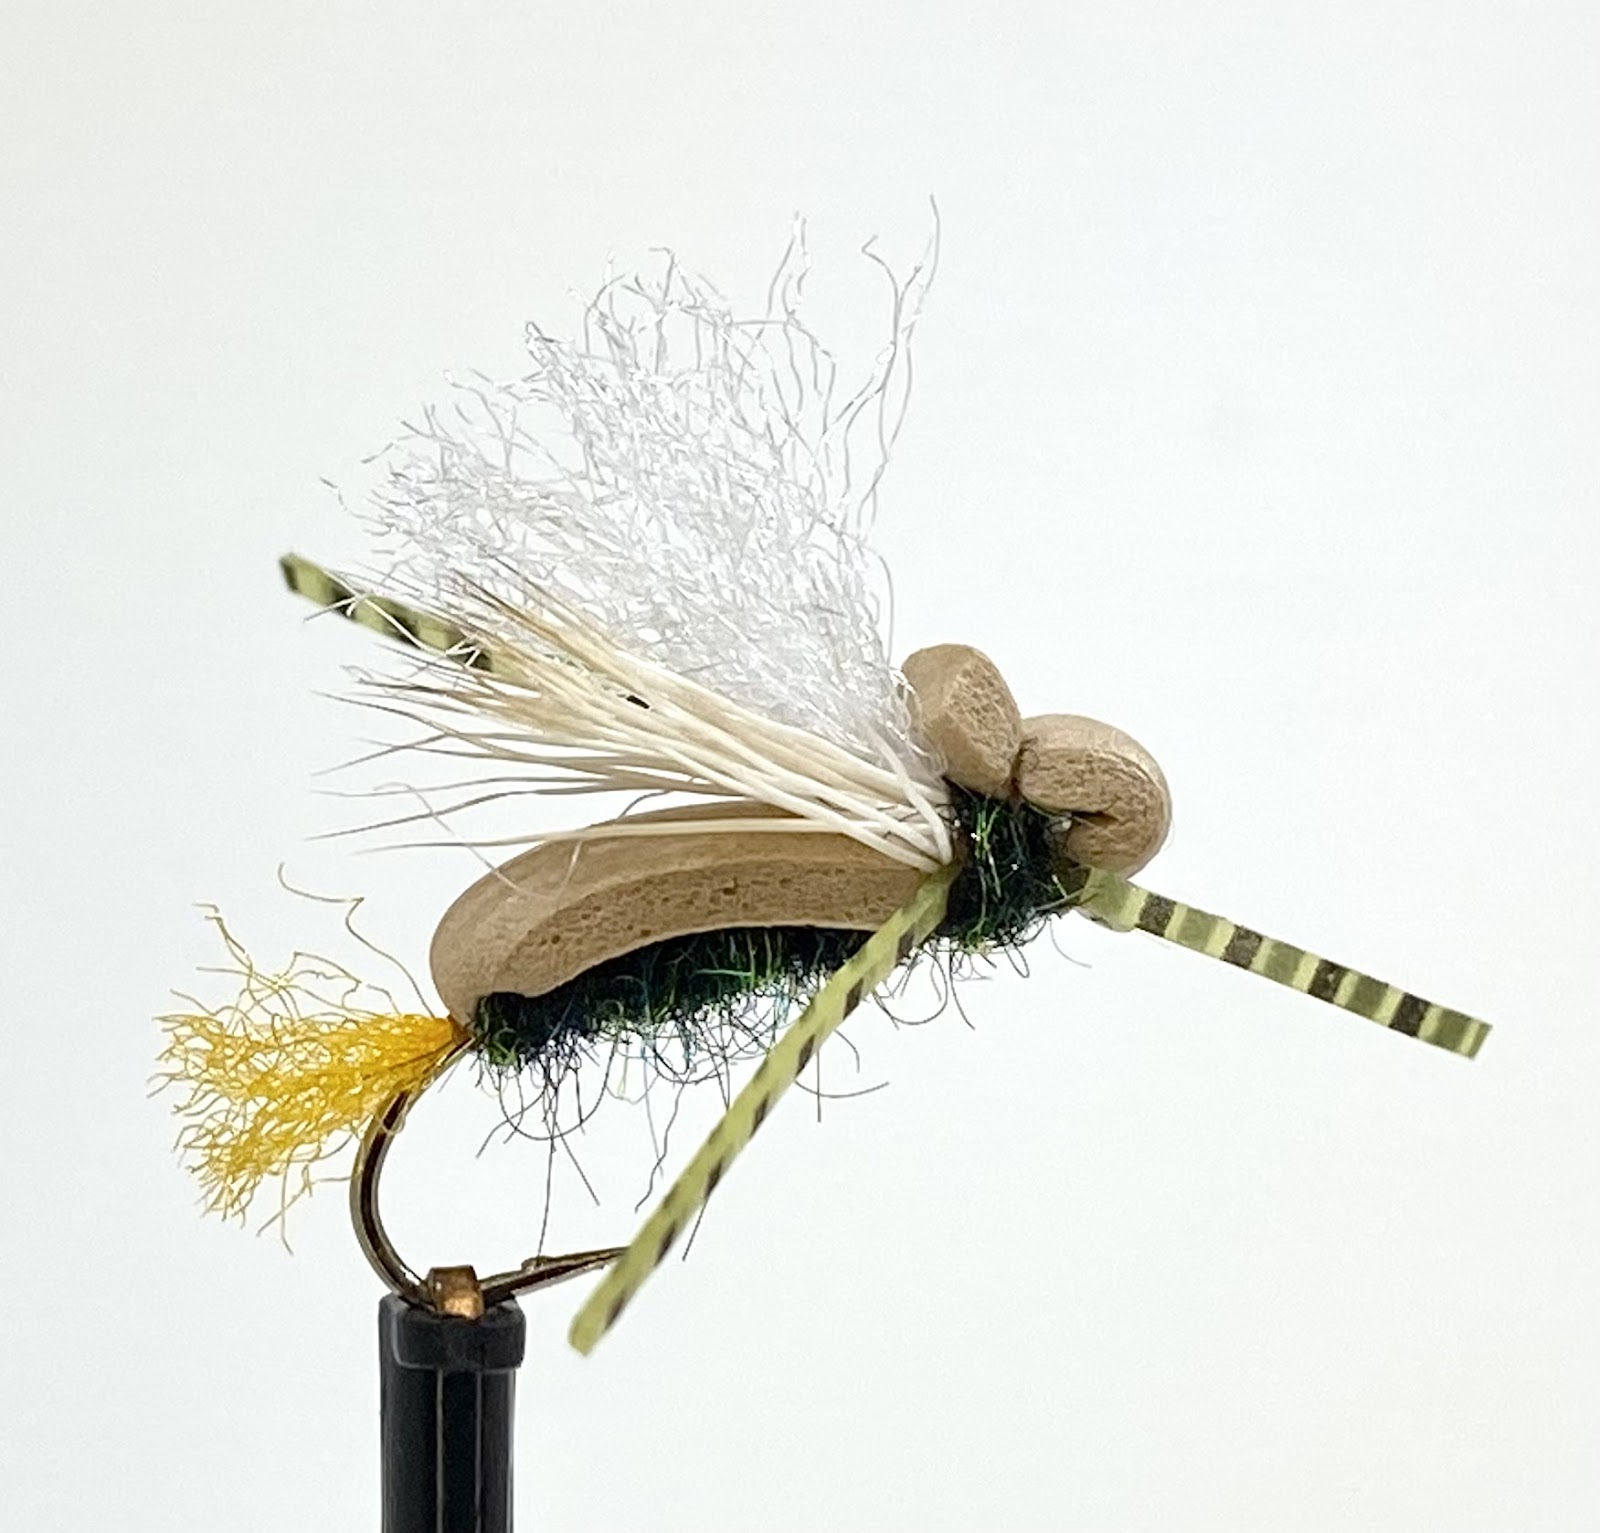
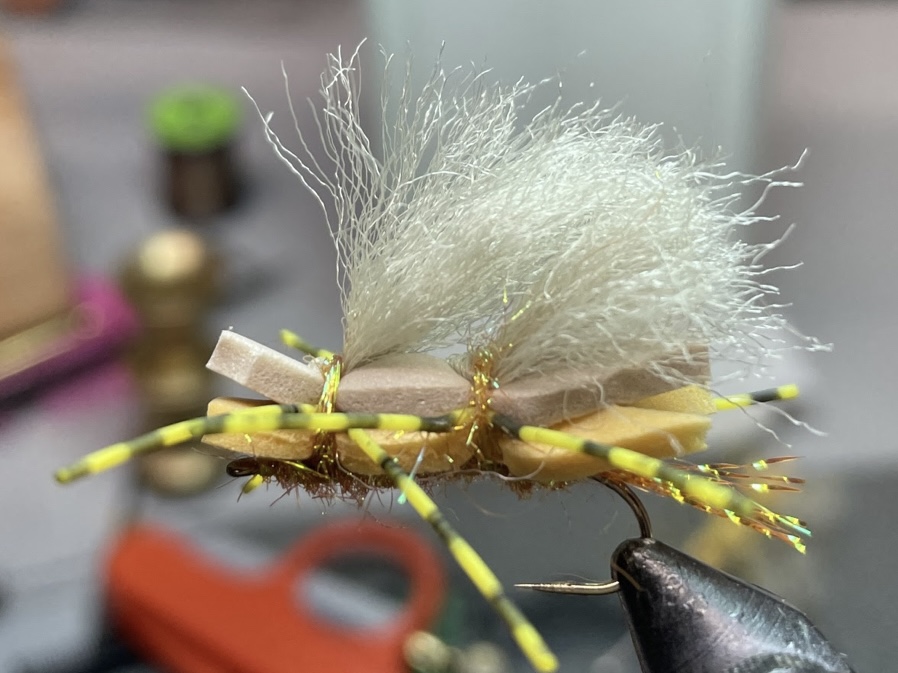
This year, however, we three amigos will make our trip to Montana in the third week of July and the salmon flies will likely be a memory by then. Hatch charts for the area say that a slightly smaller stonefly, the golden stone, follows the salmon fly hatch. I’d come to admire Cheech Pierce’s Chubby Chernobyl Salmon fly and thought that I might tie a similar fly in golden stone colors on a smaller hook.
That’s the origin story. Despite its Montana roots, I think the fly, or a very similar one, might have its uses here in the Midwest. A size 10 version tied a bit sparser and in perhaps more muted colors could make an excellent hopper imitation hereabouts. With its robust foam body and buoyant wing material, it’s sure to make a great top fly in any hopper/dropper combo. You can follow a link to a video that shows you how I tie the fly. In the video I explain the origin of the name and offer prejudiced opinions about our sport. I hope you enjoy it.